In part 1 we looked at factors that influence camera image quality – beyond the number of megapixels, being the parameter typically used to highlight image quality potential. Now let’s put it into the context of indoor drone inspection.
Starting drone inspections means you must acquire a drone system that matches your needs. It should be designed considering factors relevant to the type of inspections you want to do. There may not be one perfect match for all types of jobs you do so you may need a couple of different systems.
In addition to getting the right tool(s), you must also know what you’re doing. There are operational factors that can take your image quality from good to great. Not to say factors that can completely save your day and keep you from spending way too much time. Or even save you from this scenario: Having to go back on-site and do the job again because you didn’t check image quality while working.
Drone inspection is a time-saver in any case, so don’t hurry only to find out you failed the most important purpose on your agenda: Useful visual documentation of structural integrity.
Designed with a focus on the image
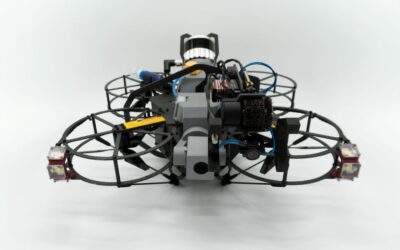
At the very basic level, the Scout 137 Drone is an advanced flying camera. But it has a number of design features to help you obtain the best visual data possible from your drone inspections.
First of all, it is a good point to mention that the Scout 137 is a tethered drone system. This is an important factor that takes away time pressure related to changing batteries all the time. Uninterrupted inspection, we call it. Becoming an experienced Scout 137 user, you will find the entire system is made for getting good data and making it useful.
Let’s go through some of the other design choices we made.
4K quality when it matters most
The Scout 137 Drone captures video data in 4K resolution, suitable for capturing very fine detail. All data from the camera is location-tagged and stored to the memory card in full resolution, as is also the case with inspection replays uploaded to the Scout Portal.
Live inspection video displayed on the tablet and on the portal, are down-sampled to 1080p to optimise overall system performance during the live inspection. This is perfectly sufficient for a pilot and a remote inspector to keep an overview of the situation throughout the inspection. But there are situations where full 4K resolution is useful while on-site and flying.
So we added a 4K preview function: Every time the pilot clicks the POI button on the controller, a location-tagged photo is added to the inspection dataset and a small thumbnail of that photo appears on the tablet. The pilot can click the thumbnail to open the 4K photo in full-screen view for a closer look, while the drone hovers on the spot. Panning and zooming the photo allows scrutiny of the finest detail.

Adding a POI and checking it is of course interesting once something that requires extra attention is spotted. Very small defects may become immediately distinguishable and something that looks like a small defect might prove to be insignificant when examined closer.
But taking a few seconds to study the photo and zooming in closely, also allows you to consider general brightness and image artifacts like motion blur, gain issues, lighting and so on at full 4K quality while the drone is still in the air. Some camera setting issues may otherwise not be noticed before analysing the footage after the inspection, when your only option is extensive post-processing or revisiting the site.
4K preview allows useful considerations to be made throughout the inspection session. For example, if the light conditions change: Pause, check your 4K and do some tweaks. Maybe you need to consider your flight mode settings? When you’ve got the settings right, you can long-press the POI button to make a flagged (important) POI. Read on for more about this.
Lidar provides stability
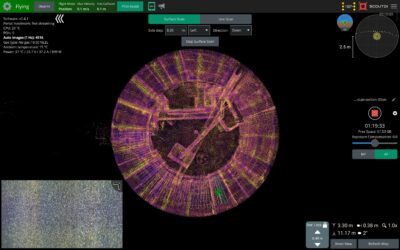
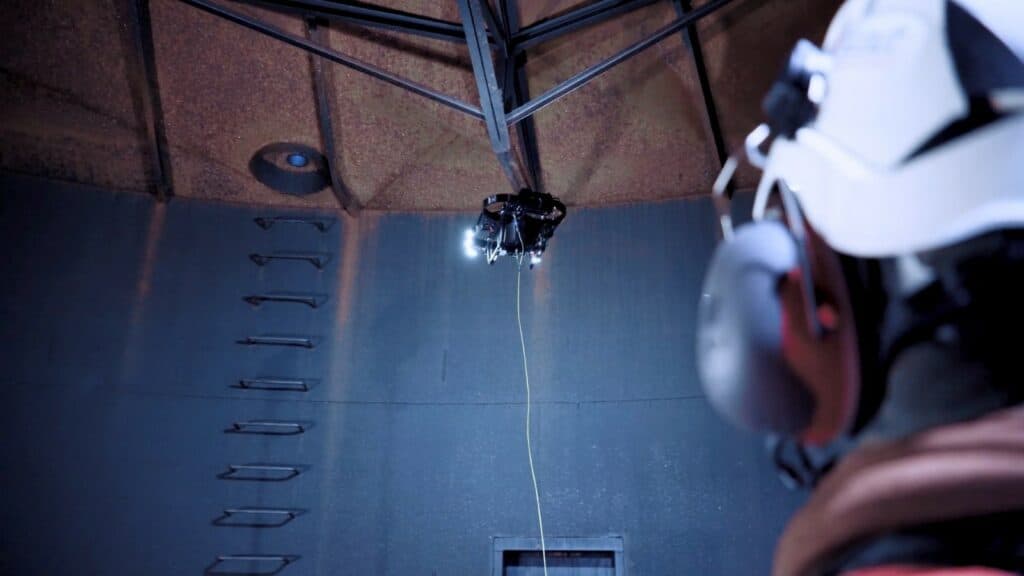
The most visible advantage of the Lidar may be the real-time situational awareness provided via the 3D point cloud. This allows you to fly inside an inspection target while you, the pilot, remain safely on the outside. But the Lidar is the foundation of so much more. For example, it offers several major anti-collision, autonomy and stability features.
Consider the situation above where you use the 4K preview to check structural artifacts or review camera settings. Having to watch the drone to keep it from drifting off and crashing into something, would greatly decrease the value of this feature.
Indeed, the Scout 137 Drone stays in the same spot while you inspect the 4K preview in peace. Using the Lidar and its other sensors, the drone always knows its exact position. Therefore, it also knows when it’s starting to drift off and whether this is due to pilot input or not. Any movement not initiated by the pilot is opposed and the drone therefore stays still in mid-air. Rock steady, without external support.
Pretty cool and very useful, since this stability comes with a general reduction of motion blur, a most prominent risk factor when flying a moving camera in dark places. A camera that doesn’t shake and twitch, produces smoother images and preserves fine detail better.
Another effect of this Lidar-based system is the ability to do moves like fly-along-wall. Flying close to any surface with anti-collision engaged, will cause the drone to ignore the motion vector component perpendicular to the surface. As a result, the drone will start to follow the surface sideways, creating super-consistent footage shot at the same optimum distance from the surface.
Exactly what is this optimum inspection distance? Read on…
Optimizing focus and distance
When focusing a lens at very close distances, depth of field will be shallow. This means that moving the camera away from that point, the image will go out of focus very abruptly. Especially when moving closer, but also when you move away as you can see below in the diagram of spatial resolution vs distance.
Of course, the closer we are to the surface of interest, the better the spatial detail of the images will be. We want that when looking for very small details. But we don’t want very shallow depth of field since anything that’s not exactly in the focal plane, will be blurred. Hence, a compromise is in order.
The camera lens of the Scout 137 Drone will have max spatial resolution when set to 30 cm distance. But working at 40cm allows almost the same detail, with the added benefit that the depth-of-field at this point is relatively deep.
Following extensive testing, we have chosen to set the camera focus to 40 cm and making that the optimum working distance for the drone. This way, we can observe objects over a wider range of distances with sufficient sharpness.
Using the USAF 1951 testing chart procedure explained in part 1, we have tested and plotted the spatial resolution as a function of working distance from 15cm to 150cm for the drone.
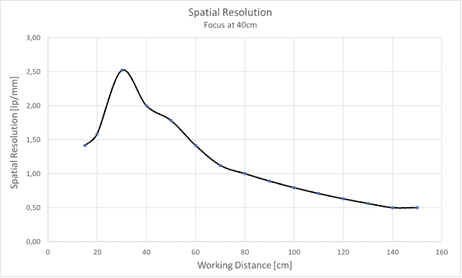
The spatial resolution increases from about 0.5 lp/mm at 150cm, to 2.5 lp/mm at 30cm working distance. You can see how the spatial resolution drops steeply off near 30 cm because of the deteriorating focus. The spatial resolution maximum at 30 cm is attractive in itself but exists as a very narrow peak and would be impractical in a real-world scenario because of the rapid degradation with working distance.
This is also the reason why the close mode of the drone is set to 40 cm. Choosing this flight mode is a good compromise between spatial resolution and depth-of-field, that also allows a little extra collision safety. Selecting this mode, you can see a 40 cm virtual sphere around the drone in the mini-map of the Scout App.

Lighting and exposure
While using a small lens for an inspection drone camera (ref. part 1) makes sense because of the deeper depth-of-field, one of the disadvantages is that less light will hit the sensor behind the lens. This generally results in darker images. Using the Scout 137 Drone in spaces with little or no ambient light, a requirement emerges: We need to bring sufficient light.
The LED modules of the drone largely remove that problem.
There are six powerful LED lights, each delivering around 1 900 lm (Lumen). This means that somewhere above 11 000 lm of light is available when all LEDs are set to max power. And being tethered, the Scout 137 Drone has no problems powering all this light. In comparison, a standard 60 W light bulb emits 700-800 lm of light.
There are 3 LEDs on each side of the drone. One faces forward, one faces 70° upwards and one faces 70° downwards. This provides a relatively uniform light distribution in the entire half-sphere in front of the drone and ensures that we have enough light even when the camera is pointing 90° upwards or downwards.
Light presets
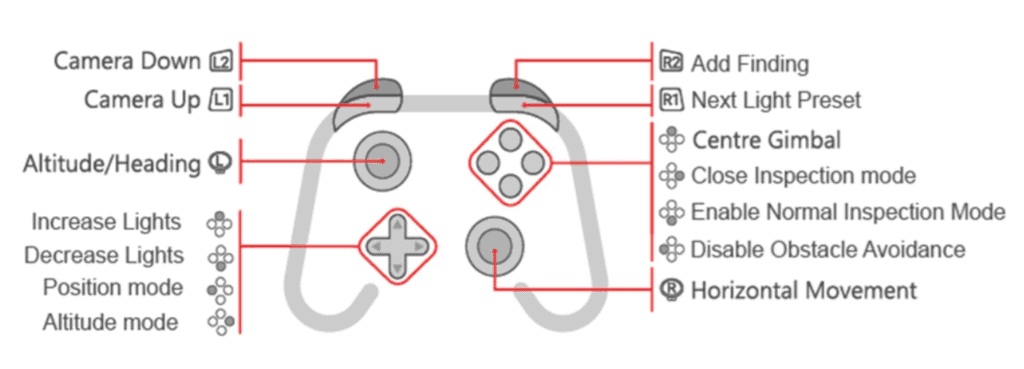
We have also arranged a sequence of preconfigured LED settings that can be cycled through by clicking a dedicated controller button:
- All LEDs active
- Only upward-facing LEDs active
- Only downward-facing LEDs active
- Only forward-facing LEDs active
- Only right-side LEDs active
- Only left-side LEDs active
And here’s the button, marked with yellow:
Dimming all active LEDs up or down can be done using the controller’s arrow buttons and together this allows for a wide range of lighting options available on-the-fly. Including oblique lighting.
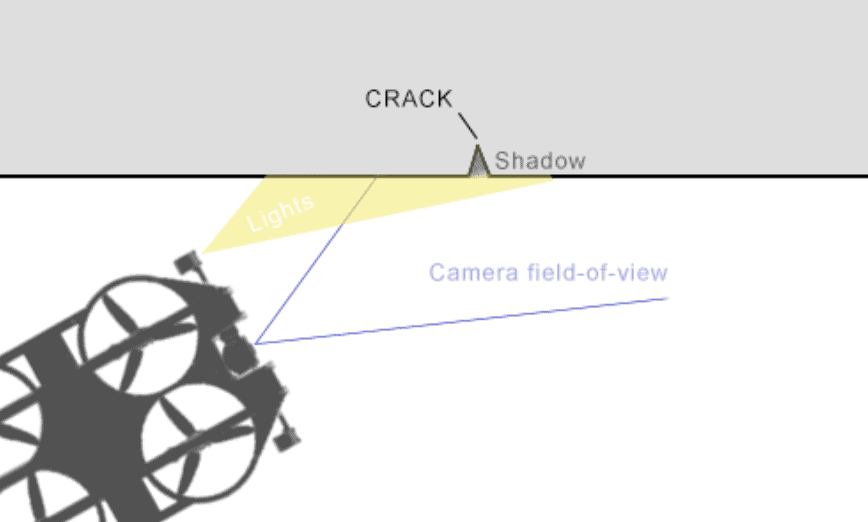
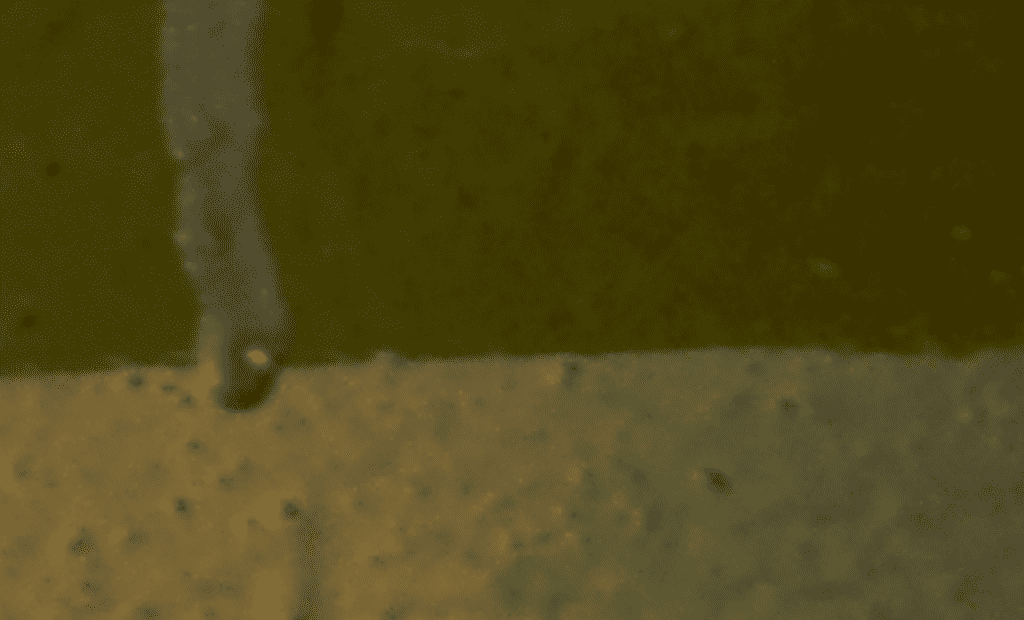
Oblique lighting
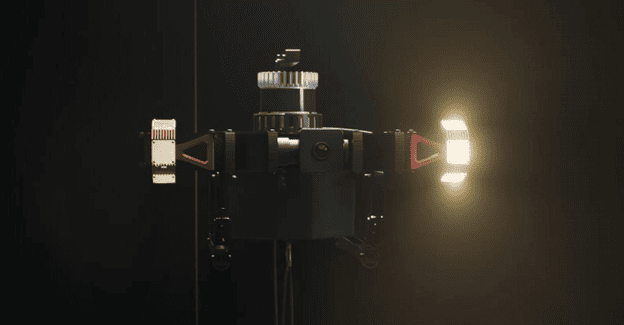
Oblique lighting is often used to reveal detail by creating shadows on a surface. Even very small artifacts become more prominent when shining a light on them at a low angle, making them cast a shadow. In a drone inspection context, this means keeping all lights on one side off, flying close at a low angle and have all LEDs on the other side on.
Note that the LED drivers on the Scout 137 are analog. Meaning: There’s no PWM LED dimming and the light output doesn’t flicker👍
What you can do to improve your drone footage
We’ve now discussed a few design choices made with the Scout 137 Drone to give you the best starting point as a user.
But there is no magic button nor a silver bullet for visual inspections. It’s not possible to design a drone to automatically make perfect images in all conditions. So now let’s talk about what you can do to use these features in the best way.
Crank up the lights
In order to keep the quality of the inspection data consistent, it’s a good starting point to try and keep the overall brightness as high and even as possible. In drone inspection we want to preserve max detail. So generally, using as much light as we can without glare or white-outs, is a good idea
If your inspection asset has varying light conditions, find a matte surface in an especially dark area, if there are any. Activate close mode, fly up close to the surface and crank up the LEDs all the way. Check the 4K preview.
- Just right? Very nice, go on but be aware that you may have to do adjustments later on. So keep checking.
- Too bright? Even better, it’s likely that you’ll have sufficient light throughout the entire flight session. Take a few more 4K previews while gradually reducing the exposure compensation on the Scout Tablet until it’s just right.
- If you come across more reflective areas later and experience glare or white-outs, there are ways to get around this too and you can read about them below.
- Too dark? This is not good for drone inspection, we need a few helpful strategies. First, let’s look at the illustration below.
Three elements of exposure
Learning to balance lighting, shutter time and gain is one of the photography skills that is easy to learn but hard to master. Doing it wrong can result in footage that’s too bright or too dark, which is easily understood as no good.
But you also run the risk of running into unwanted side effects, as this diagram illustrates:
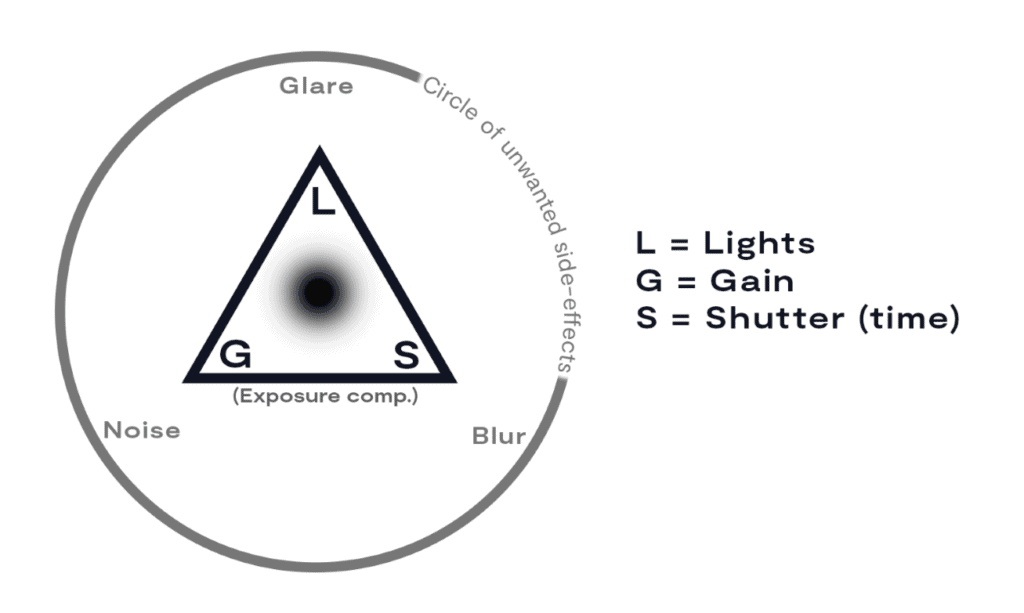
Here, we’ve broken the main elements of photographic exposure into:
- Lights (L)
- Gain (G)
- Shutter time (S)
Moving outwards from the center of the triangle in the “L” direction, means adding more light (L). Moving in the opposite direction along the same line, means decreasing the light. And so on.
In the context of image exposure, L, S and G are opposing factors: More light (L) compensates for less shutter time (S). More shutter time (S) compensates for less light (L), Gain (G) can compensate for both and so on.
But there’s plenty of opportunity to over-compensate and create new problems. Imagine that you’re increasing either L, G or S. On the illustration above, this means moving further out in the direction of the corresponding pointy corner. Sooner or later you’ll move into some unwanted side-effects:
- Too much light, L, may result in glare or white-outs: Light reflections overloading the camera sensor, resulting in bright/white areas in the footage. This is mainly a problem for very glossy surfaces but can affect all or parts of the image.
- Too much gain, G, will result in noisy images: Electronic circuitry amplifying a weak signal will also amplify any present noise, resulting in random variations of brightness or colour.
- Too much S, i.e. too long shutter time may result in blurry images: If the camera moves while the shutter is open, the resulting image will appear streaked or blurred since a changing scene was “recorded” onto a single photo or video frame.
Make especially sure you understand the relation between lights, shutter time and motion blur.
It is a good idea to keep these relations in mind when considering camera and drone settings.
Working distance and flight modes
Before you start experimenting with camera settings there are a few other things you could consider. For example, if your 4k preview looks dark even with the lights on max, consider your working distance.
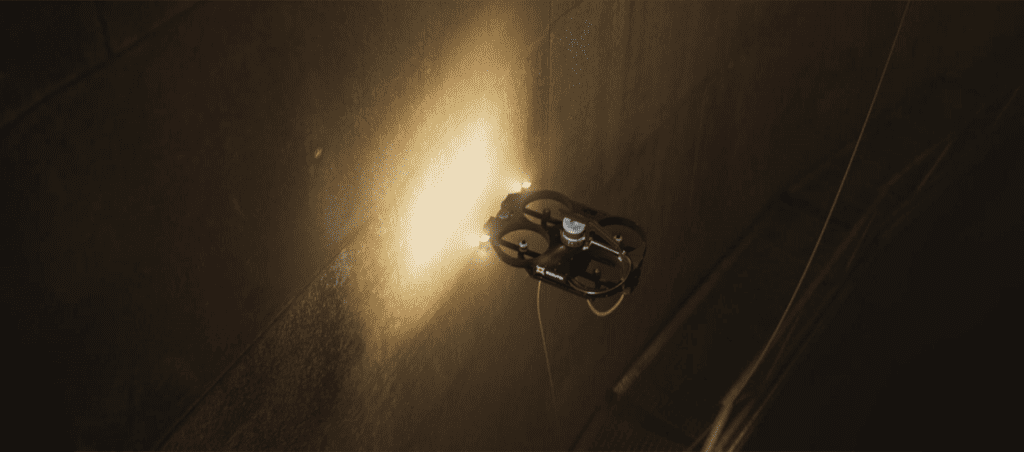
Even with over 11 000 Lumens of lights available, you can’t light up an entire 10 000 m3 storage tank. If you’re too far away from the inspection surface, the light will spread out into the darkness and you won’t get much reflected back into the camera. Get closer.
Remember that the optimum working distance for the drone camera is set to 40 cm. This is where it has optimum performance in terms of spatial resolution and depth-of field, and there’s a separate button for keeping this exact distance to any object around the drone: Click the close mode button on the controller and fly as close as the Scout 137 will go.
(See control button mapping in the summary of this article!)
If you’re less concerned about detail or need to cover a large area in short time, you can also switch to normal mode which will let the drone travel faster and keep 1m distance to its surroundings. But be aware that the spatial resolution is below 1 lp/mm at this distance
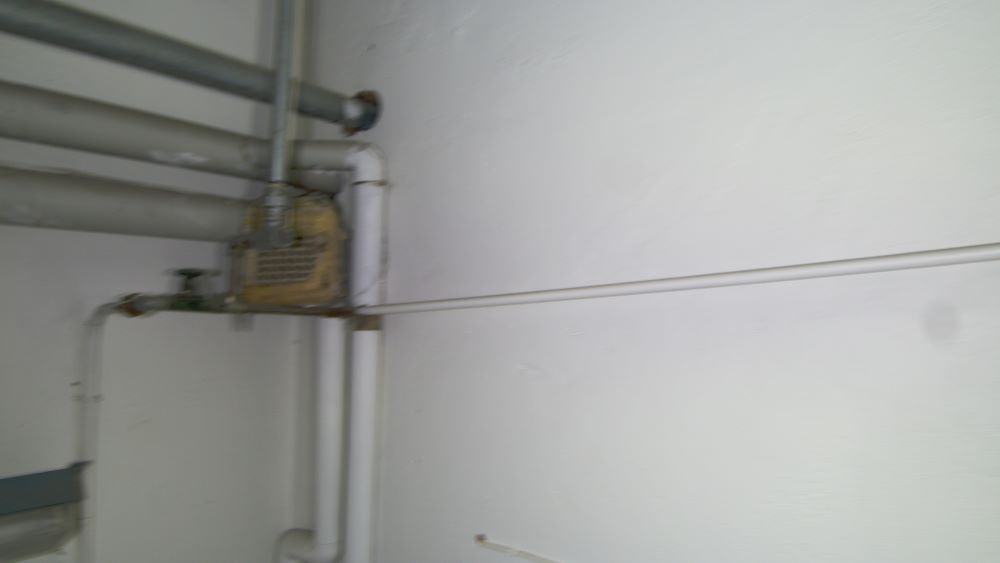
Sometimes you may have to work at even longer distances. But remember that the farther away from a surface, the darker it gets. And the faster you move your camera, the greater the risk of motion blur. Thus, moving sideways at a distance aggravates the situation both in terms of available light and camera motion speed.
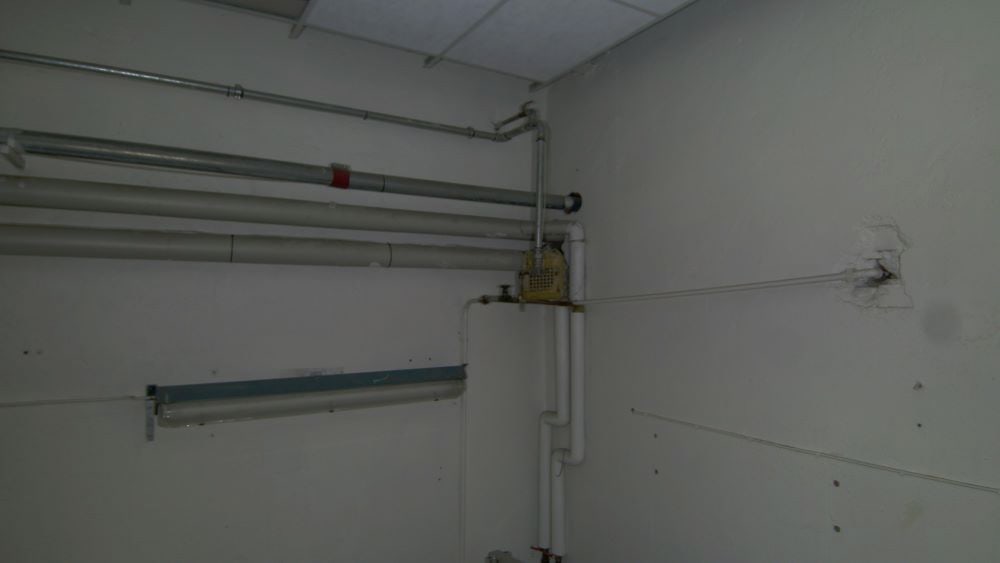
Note: We had to dim the LEDs for the sake of the example in this room.

Generally, it is wise to stay close enough that the onboard lights are sufficient. If the images are bright enough but you’re getting motion blur, can you fly slower? If you can’t, consider flying closer to light up your surface more and make your images brighter. And so on and so forth.
Experimenting with working distance and speed can be all it takes. But sometimes, you may have to resort to other forms of compensation.
Exposure compensation and gain
“Exposure compensation” means gain for some cameras, shutter time for others and in some cases both. For the Scout 137 camera, it means shutter time.
Auto exposure
Yes, the Scout 137 Drone has an automatic exposure compensation, called auto exposure. This function cannot be switched off easily, but settings for the upper and lower limits are available under advanced settings in the Scout App. You can also lock the current level via the Scout app.
Auto exposure is a very handy function that automatically puts the general light-sensitivity of the camera chip in the ballpark area of what is required by the current scene, or frame contents. Almost any camera has it, and almost any application benefits from it.
But the auto-exposure can be fooled: In many cases, like with the Scout 137 camera, auto exposure is based on the average pixel brightness of the current image. So if there is a high-reflection area in the current frame causing extra brightness, the auto-exposure may be decreased and leave other areas in the image too dark.
If this happens, and the dark area is your current interest, try moving the drone to get the bright area out of the frame. This should cause auto-exposure to raise the general sensitivity a little and expose more detail in the dark area. If this doesn’t work, or you need to capture both the too bright are and the dark areas, you may need to try manual exposure compensation and capture the two areas separately.

Exposure compensation
The “manual” exposure compensation function is often what photographers reach for first to fix their images. You may consider it a user-added bias to the auto-exposure.
In drone inspection, you should think twice before using it since it comes with a caveat.
Referring to the LGS diagram above, follow the pointy corner of the Shutter time (S) out towards the circle of unwanted side effects to see what eventually happens to your image when increasing shutter time: Blurry features and loss of detail. No surprise by now.
Generally, you want shutter time to be as short as possible. Meaning: Keep exposure compensation as low as you can.
This also means that if you have an image that is too bright, try to decrease the exposure compensation first.
But if your image is too dark, your lights are maxed and you can’t fly any closer etc., consider increasing the exposure compensation. You can do this via a slider in the Scout App. This means increasing shutter time, thus increasing the risk of motion blur and if you can’t get close enough you may have to fly slower to compensate.
Gain
Only after adding exposure compensation, should you consider increasing the gain. Gain is an electronic function of the image sensor that simply increases the value of every pixel. This will amplify all the noise in your images, adding random variations to the actual pixel values and making it harder to resolve fine detail. But if you have no other options and still need more brightness, this may be your fix.
Since it is not intended to be used very often, the gain setting is located in the advanced camera settings. One setting in which it could be useful, is if you’re in the middle of a large tank, far away from any surface and you want extra visual support from the camera feed, for navigation. Cranking up the gain temporarily would make the camera feed brighter. But all image data would also be much more noisy. So it would be important to crank it back down again when you’re closer to a surface and doing inspection, to avoid noisy inspection data.
Summary
We have now discussed many different things that affect image quality and situations where you need to stop and have a think. Let’s try to summarize. Here are the things to try, in the order to try them:
Generally:
- Stay close for max spatial resolution
- Max the lights
- Check the 4K preview now and then
Too bright:
- Stay close for max resolution
- Keep the lights maxed
- Decrease exposure compensation to balance brightness and reduce motion blur
- Check the 4K preview and repeat
Too bright in parts of image, other parts too dark:
- Stay close
- Decrease exposure compensation to balance the too-bright area
- Then move drone to get the bright area (glare) out of the frame
- Increase exposure compensation to reveal dark area detail
- (Only decrease lights if nothing else takes the glare away)
Too dark
- Stay close
- Make sure lights are maxed
- Don’t move too fast.
- Increase exposure compensation
- Check the 4K preview
- Only use gain as the last resort.
Keep thinking about the opposing elements of photographic exposure and test your drone. Experiment with the things discussed above and get some experience. Having a good tool and using it right will get you where you want to be 👍
Control at your fingertips
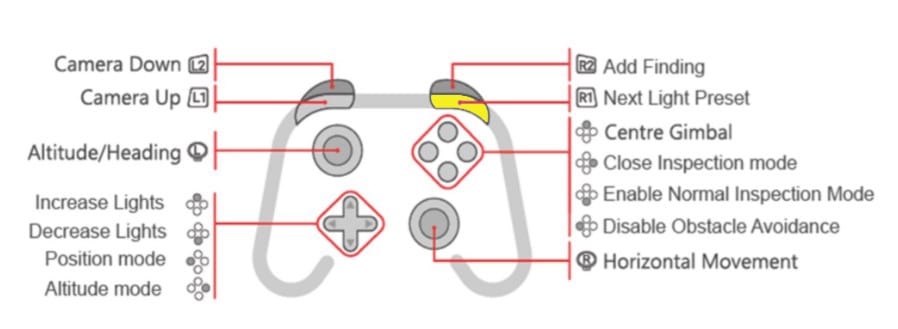
Already know your way around gaming controllers and don’t need to read up on that? OK, but below are some key controller buttons you need to know.
Flagged or not flagged POI
To distinguish important POI from less relevant ones, for example abundant 4k preview POIs, Use “flagged POI” for the important ones. This works with the Scout App from version 1.14 and on:
- R2 short press: Mark regular POI and create 4K preview
- R2 long press: Mark flagged POI and create 4K preview
- Open 4K preview by touching onscreen thumbnail bottom-right in the Scout App.
- Remember that only the latest 4K preview is available.
Regular and Flagged POIs are grouped separately in the Scout Portal. So if you end up using 4K previews very frequently, it is advisable to use flagged POI for all your real inspection findings to distinguish between them easily.
Pretty handy!
LED light controls
The Scout 137 Drone’s LEDs have several lighting modes that you can cycle through. This lets you decide which LEDs are on: Upper, middle, lower, just left, just right or all.
You can cycle through these lighting modes and adjust the overall LED brightness directly from the Scout 137 controller:
- R1: Cycle lighting modes
- Arrow buttons Up/Down: Adjust overall LED brightness
Also pretty handy, not to say this is something you really have to know!
Exposure control
Exposure control plus/minus is available on-screen bottom right in the Scout App, directly the space where the latest 4K preview pops up. You can also lock the current auto exposure level via the screen.
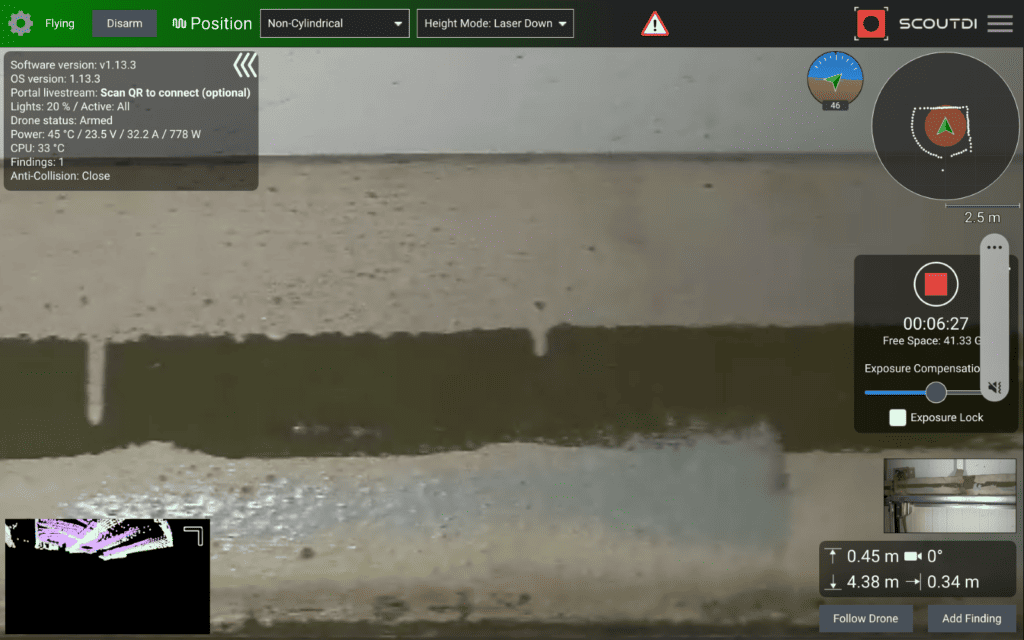
Other nifty details available on the Scout App dashboard, include the MiniMap and the Distances block. The MiniMap gives an immediate overview of detected objects near the drone. The “virtual protection bubble” resulting form the current flight-mode, is shown. This tells you e.g. when you need to change flight mode to get closer to specific objects.
The Distance block shows you distances to ceiling and floor, camera tilt and distance to nearest obstacle straight ahead.
End of part 2 – click here to read part 1 – “Beyond the megapixel”!
Want more?
As clearly demonstrated, we obsess over image quality at ScoutDI. If these blog posts have caught your interest and you want to know more, don’t hesitate to get in touch with us with any questions about your specific application.
You can reach us via the form below or by sending an email to sales@scoutdi.com 👍
We’re happy to help, no strings attached!
Get in touch with us!
Want to know more about drone inspection and how to get the best out of it?
Submit the form and let’s talk! 👍